Let's create Zephyr RTOS based app and start debugging with Raspberry Pi Pico in VS Code
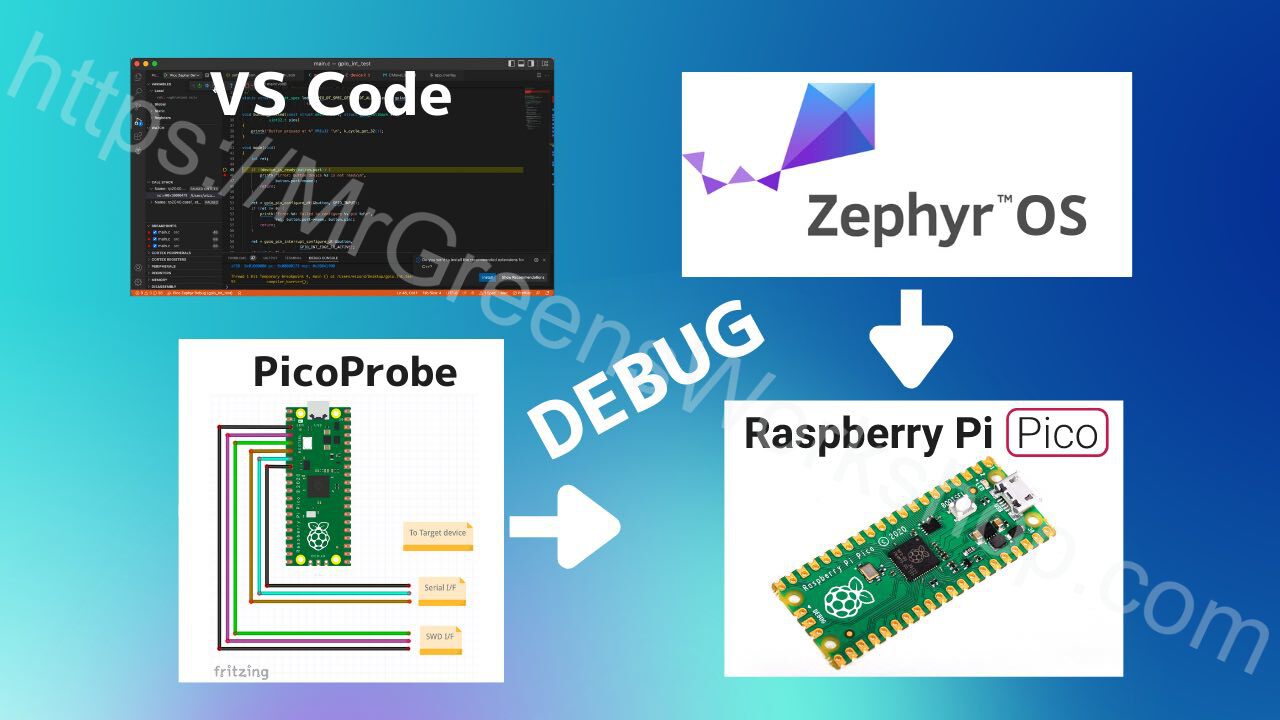
In this post I will talk about, how to create Zephyr based applications and how to debug on Raspberry Pi Pico. I assume that you have finished set up the development environment. This video explains how to set up the development environment, so please watch it first if needed.
Pick a sample application
Let’s pick a sample application, close enough to what we want to do. This time I need a sample for external GPIO Interrupts. Let’s check Zephyr sample applications.
$ cd ~/zephyrproject/zephyr/samples
$ ls
application_development	drivers			posix
arch			hello_world		sensor
basic			index.rst		shields
bluetooth		kernel			subsys
boards			modules			synchronization
classic.rst		net			tfm_integration
compression		philosophers		userspace
$ cd basic
$ ls
basic.rst	blinky_pwm	fade_led	rgb_led		threads
blinky		button		minimal		servo_motor
$ cd button
$ ls
CMakeLists.txt	README.rst	prj.conf	sample.yaml	src
Let’s check button sample’s source code. Here is the GPIO interrupt config.
cat src/main.c
...
void main(void)
{
...
    ret = gpio_pin_interrupt_configure_dt(&button, GPIO_INT_EDGE_TO_ACTIVE);
...
    gpio_init_callback(&button_cb_data, button_pressed, BIT(button.pin));
    gpio_add_callback(button.port, &button_cb_data);
...
}
I will use this sample for my application base.
How to make standalone Zephyr-based applications
There are 3 types of applications.
- Applications in zephyrproject/zephyr/ folder called as Zephyr repository applications.
- Applications in zephyrproject/ folder called as Zephyr workspace applications.
- Applications outside of zephyrproject folder called as Zephyr freestanding applications.
<home>/
├─── zephyrproject/
│     ├─── .west/
│     │    └─── config
│     ├─── zephyr/
│     │    ├── arch/
│     │    ├── boards/
│     │    ├── cmake/
│     │    ├── samples/
│     │    │   ├── hello_world/  -> Zephyr repository application
│     │    │   └── ...
│     │    ├── tests/
│     │    └── ...
│     ├── bootloader/
│     ├── modules/
│     ├── ...
│     └── applications/
│         └── app/               -> Zephyr workspace application
│
└─── app/                        -> Zephyr freestanding application
     ├── CMakeLists.txt
     ├── prj.conf
     └── src/
         └── main.c
Zephyr Project Reference: Application Development
This time I will use freestanding application. Let’s start by copying the button sample folder. Please don’t use spaces for folder names. Otherwise it will not work.
cd ~/
cp -R ~/zephyrproject/zephyr/samples/basic/button ~/Desktop/gpio_int_test
First I will try to compile for nucleo board because button sample does work with no change.
$ cd ~/Desktop/gpio_int_test
$ west build -b nucleo_f411re
usage: west [-h] [-z ZEPHYR_BASE] [-v] [-V] <command> ...
west: error: argument <command>: invalid choice: 'build' (choose from 'init', 'update', 'list', 'manifest', 'diff', 'status', 'forall', 'help', 'config', 'topdir', 'selfupdate')
$
According to documentation, we need to set some environment variables. But don’t rush, we will fix this later.
Zephyr Project Reference: Environment Variables
Temporarily, I will run Zephyr environment script. With this, environment variables last until terminal closes.
$ source ~/zephyrproject/zephyr/zephyr-env.sh
$ west build -b nucleo_f411re
-- west build: generating a build system
Loading Zephyr default modules (Zephyr base).
-- Application: /Users/user/Desktop/gpio_int_test
-- Found Python3: /usr/local/opt/python@3.9/bin/python3.9 (found suitable exact version "3.9.13") found components: Interpreter
-- Cache files will be written to: /Users/user/Library/Caches/zephyr
-- Zephyr version: 3.0.99 (/Users/user/zephyrproject/zephyr)
-- Found west (found suitable version "0.13.1", minimum required is "0.7.1")
-- Board: nucleo_f411re
...
[156/156] Linking C executable zephyr/zephyr.elf
Memory region         Used Size  Region Size  %age Used
           FLASH:       15108 B       512 KB      2.88%
            SRAM:        4416 B       128 KB      3.37%
        IDT_LIST:          0 GB         2 KB      0.00%
Successfully compiled.
VS Code project setup
Let’s setup standalone Zephyr application on VS Code. Open the project folder we just copied in VS Code. Delete build folder.
Let’s add Zephyr environment variables to VS Code. With this, environment variables are added to VS Code’s terminal.
- Create a new folder named .vscode
- Create a new file named settings.json inside of it.
- Copy and paste the config written below.
{
 "terminal.integrated.env.osx": {
     "PATH": "$HOME/zephyrproject/zephyr/scripts",
     "ZEPHYR_BASE": "${env:HOME}/zephyrproject/zephyr",
 },
 "terminal.integrated.env.linux": {
     "PATH": "$HOME/zephyrproject/zephyr/scripts:${env:PATH}",
     "ZEPHYR_BASE": "${env:HOME}/zephyrproject/zephyr",
 },
 "terminal.integrated.env.windows": {
     "PATH": "${env:USERPROFILE}\\zephyrproject\\zephyr\\scripts;${env:PATH}",
     "ZEPHYR_BASE": "${env:USERPROFILE}\\zephyrproject\\zephyr",
 },
}
You can find more about VS Code workspace settings from here.
- Then reopen the VS Code open terminal inside VS Code and try to compile.
$ west build -b nucleo_f411re
-- west build: generating a build system
Loading Zephyr default modules (Zephyr base).
-- Application: /Users/user/Desktop/gpio_int_test
-- Found Python3: /usr/local/opt/python@3.9/bin/python3.9 (found suitable exact version "3.9.13") found components: Interpreter
-- Cache files will be written to: /Users/user/Library/Caches/zephyr
-- Zephyr version: 3.0.99 (/Users/user/zephyrproject/zephyr)
-- Found west (found suitable version "0.13.1", minimum required is "0.7.1")
-- Board: nucleo_f411re
...
[156/156] Linking C executable zephyr/zephyr.elf
Memory region         Used Size  Region Size  %age Used
        FLASH:       15108 B       512 KB      2.88%
         SRAM:        4416 B       128 KB      3.37%
     IDT_LIST:          0 GB         2 KB      0.00%
Successfully compiled.
Let’s set our board name. Open the CMakeLists file and add this set(BOARD rpi_pico) after cmake_minimum_required
...
cmake_minimum_required(VERSION 3.20.0)
set(BOARD rpi_pico)
...
Let’s try to build without board option.
$ west build -p
...
/Users/user/Desktop/gpio_int_test/src/main.c:22:2: error: #error "Unsupported board: sw0 devicetree alias is not defined"
   22 | #error "Unsupported board: sw0 devicetree alias is not defined"
      |  ^~~~~
[117/160] Building C object zephyr/drivers/gpio/CMakeFiles/drivers__gpio.dir/gpio_rpi_pico.c.obj
ninja: build stopped: subcommand failed.
FATAL ERROR: command exited with status 1: /usr/local/bin/cmake --build /Users/user/Desktop/gpio_int_test/build
We have compile error because raspberry pi pico board doesn’t have switch.
Adding switch0
Let’s add switch0, for this we will use app overlay file. Let’s check switch0 definition in nucleo board’s device overlay file.
$ cat /Users/wizard/zephyrproject/zephyr/boards/arm/nucleo_f411re/nucleo_f411re.dts
...
/ {
	gpio_keys {
		compatible = "gpio-keys";
		user_button: button {
			label = "User";
			gpios = <&gpioc 13 GPIO_ACTIVE_LOW>;
		};
	};

	aliases {
		led0 = &green_led_2;
		sw0 = &user_button;
	};
};
...
Let’s create a new app.overlay file and put what we need in it.
/ {
	gpio_keys {
		compatible = "gpio-keys";
		user_button: button {
			label = "User";
			gpios = <&gpio0 28 GPIO_ACTIVE_LOW>;
		};
	};

	aliases {
		sw0 = &user_button;
	};
};
Zephyr Project Reference: Devicetree HOWTOs
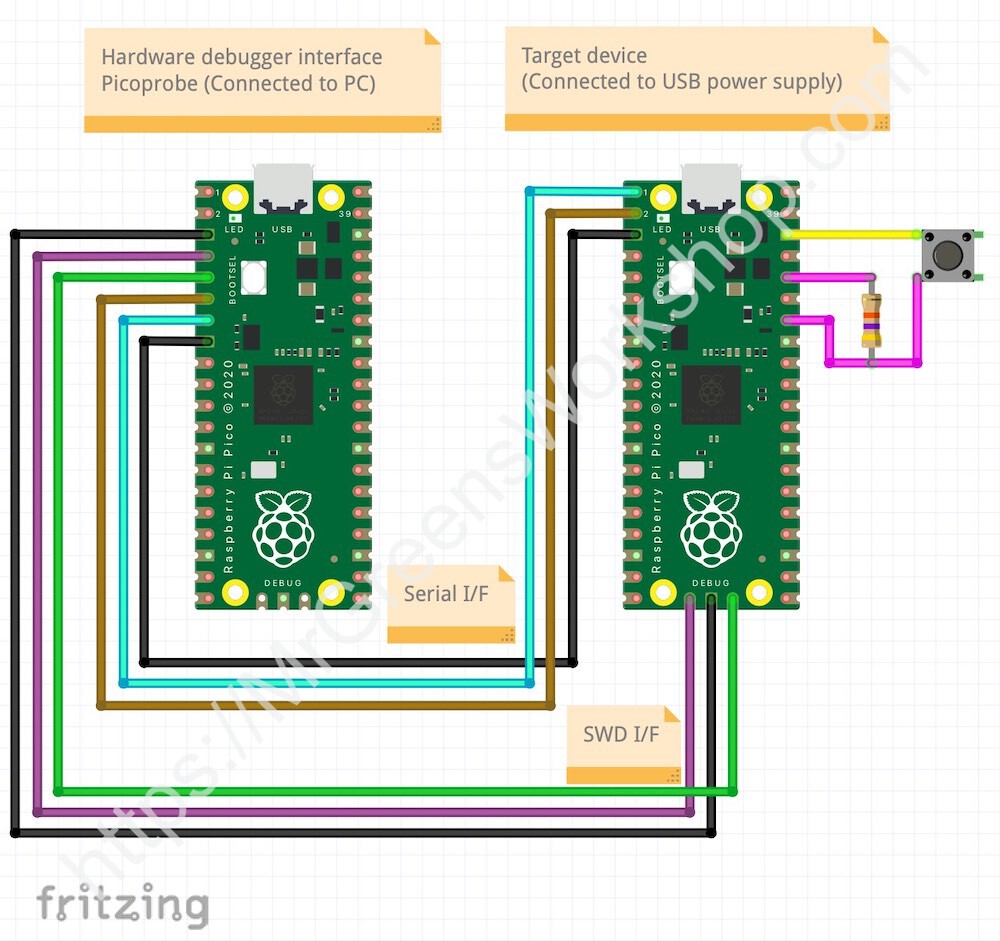
In my circuit, the switch connected to GPIO 28. I will show the schematic later.
Let’s try to compile.
$ west build -p
WARNING: This looks like a fresh build and BOARD is unknown; so it probably won't work. To fix, use --board=<your-board>.
Note: to silence the above message, run 'west config build.board_warn false'
-- west build: generating a build system
...
[160/160] Linking C executable zephyr/zephyr.elf
Memory region         Used Size  Region Size  %age Used
      BOOT_FLASH:         256 B        256 B    100.00%
           FLASH:       11940 B    2096896 B      0.57%
            SRAM:        3760 B       264 KB      1.39%
        IDT_LIST:          0 GB         2 KB      0.00%
Converting to uf2, output size: 24576, start address: 0x10000000
Wrote 24576 bytes to zephyr.uf2
$ gpio_int_test %
Voilà!
Our binary file is located in build/zephyr folder.
For more about west command please check the link below.
Zephyr Project Reference: Building, Flashing and Debugging
How to debug?
On-chip debugging with Zephyr RTOS + App on Raspberry Pi Pico
What we need?
- Hardware debugger interface (SWD)
- A Raspberry Pi Pico flashed with picoprobe firmware
- Software for on-chip debugging
- OpenOCD build for picoprobe
- Arm toolchain
- arm-none-eabi-gdb
- Cortex-Debug extension for VS Code
For on-chip debugging we need some hardware and software. Let’s prepare one by one.
Hardware debugger interface
First hardware, I will use picoprobe for Hardware debugger interface.
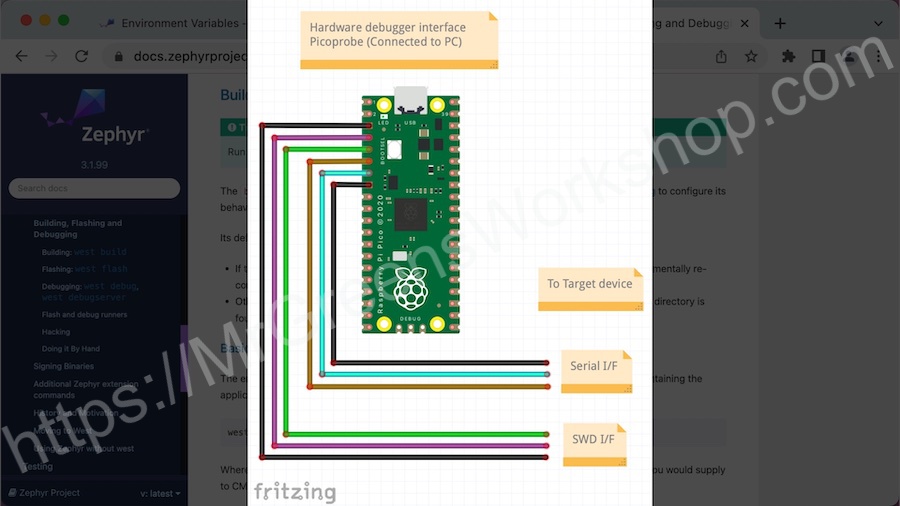
Let’s get the compiled binary for picoprobe and flash to Raspberry Pi Pico. Open this link.
Find the link under the title Debugging using another Raspberry Pi Pico and download from Download the UF2 file
Put the Raspberry Pi Pico into bootloader mode by pushing bootsel button, while plugging to your computer. Then copy the UF2 file to your Pico’s storage.
$ cp ~/Downloads/picoprobe.uf2 /Volumes/RPI-RP2/
Building OpenOCD
Currently OpenOCD does not officially support the picoprobe. So, we need to build a specific version of OpenOCD.
For macOS
cd ~/
brew install libtool automake libusb wget pkg-config gcc texinfo
git clone https://github.com/raspberrypi/openocd.git --branch picoprobe --depth=1
cd openocd
export PATH="/usr/local/opt/texinfo/bin:$PATH"
./bootstrap
./configure --enable-picoprobe --disable-werror
make -j4
For Linux
cd ~/pico
sudo apt install automake autoconf build-essential texinfo libtool libftdi-dev libusb-1.0-0-dev
git clone https://github.com/raspberrypi/openocd.git --branch picoprobe --depth=1 --no-single-branch
cd openocd
./bootstrap
./configure --enable-picoprobe
make -j4
sudo make i
Since this is a Pico-specific version of OpenOCD, you don’t need to run “make install”. We will add OpenOCD’s paths to VS Code later.
Let’s check the OpenOCD.
$ ~/openocd/src/openocd --version
Open On-Chip Debugger 0.11.0-g4f2ae61 (2022-06-08-15:59)
Licensed under GNU GPL v2
For bug reports, read
	http://openocd.org/doc/doxygen/bugs.html
Installing ARM tools
For macOS
cd ~/
brew tap eblot/armeabi
brew install arm-none-eabi-gdb
Let’s check the arm-none-eabi-gdb.
$ arm-none-eabi-gdb --version
GNU gdb (GDB) 10.1
Copyright (C) 2020 Free Software Foundation, Inc.
License GPLv3+: GNU GPL version 3 or later <http://gnu.org/licenses/gpl.html>
This is free software: you are free to change and redistribute it.
There is NO WARRANTY, to the extent permitted by law.
VS Code Settings
- First install Cortex-Debug extension.
- Open settings.json file and add OpenOCD binary path.
{ "cortex-debug.openocdPath": "${env:HOME}/openocd/src/openocd", ... - Create a new file named launch.json inside of .vscode folder and add all these settings.
{
  "version": "0.2.0",
  "configurations": [{
 "name": "Pico Zephyr Debug",
 "device": "RP2040",
 "gdbPath": "arm-none-eabi-gdb",
 "cwd": "${workspaceRoot}",
 "executable": "build/zephyr/zephyr.elf",
 "request": "launch",
 "type": "cortex-debug",
 "servertype": "openocd",
 "configFiles": [
   "/interface/picoprobe.cfg",
   "/target/rp2040.cfg"
 ],
 "searchDir": ["${env:HOME}/openocd/tcl"],
 "svdFile": "${env:HOME}/zephyrproject/modules/hal/rpi_pico/src/rp2040/hardware_regs/rp2040.svd",
 "runToEntryPoint": "main",
 "postRestartCommands": [
   "break main",
   "continue"
 ]
  }]
}
Final Schematic
This is the schematic for my setup. Hardware debugger interface on the left, and the target board with the button on the right.
Let’s start debugging
Open main.c and click the left side of line numbers. Breakpoints will be added accordingly.
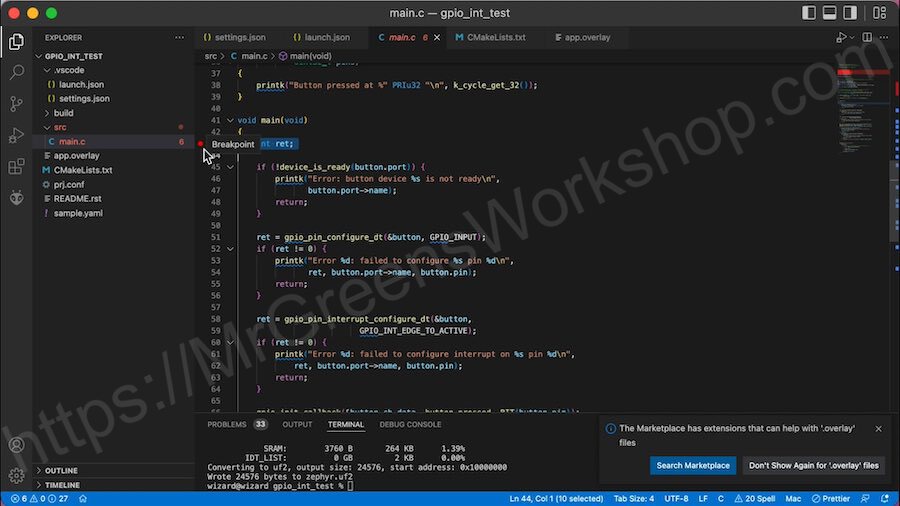
Don’t forget to compile before debugging. Then click the Run and Debug icon on the left, and click Start Debugging on top left.
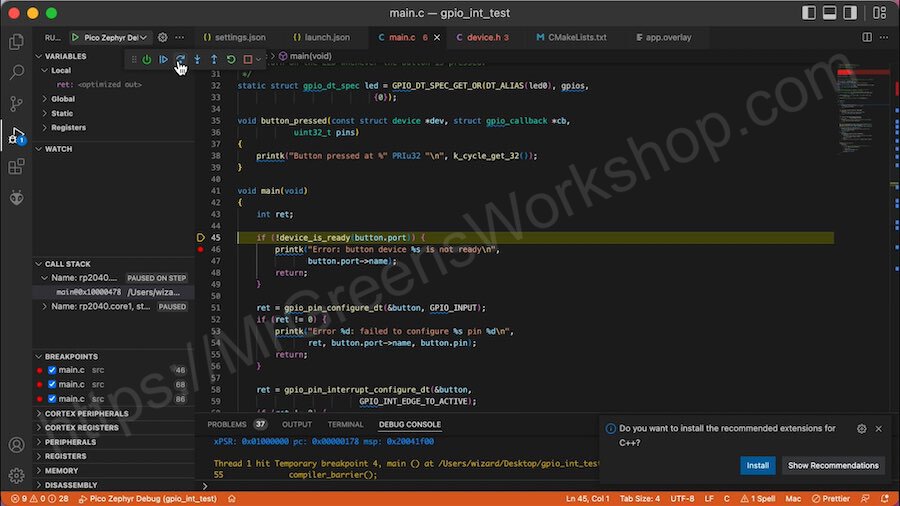
Voilà!
Let’s check with the serial terminal to see Zephyr console output. I will push the button and check the console output.
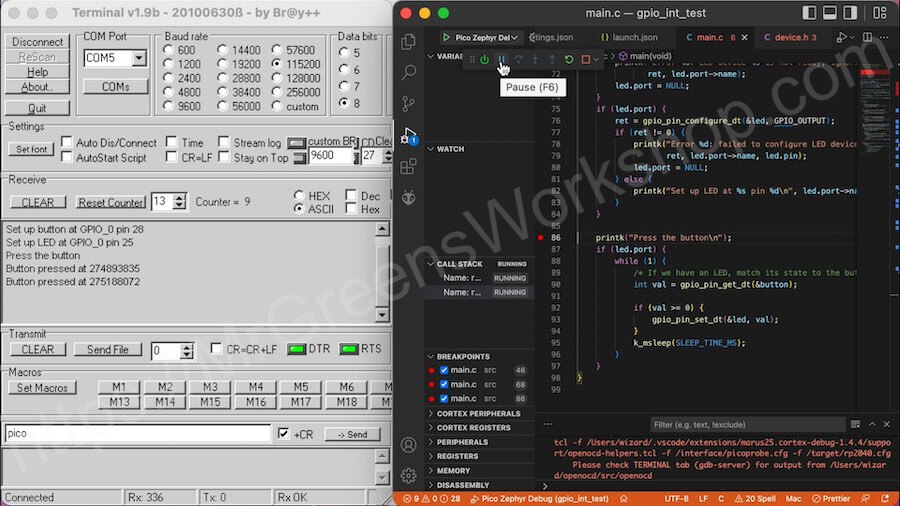
Awesome!
You Can Support My Work
Creating projects like this takes a great amount of time. Much appreciated if you consider supporting me so that I can continue projects like this and creating new contents for everyone.
You might consider supporting me via GitHub Sponsors, Patreon, or Ko-fi. For links, please see the About page.
Final words
You can access the Raspberry Pi Pico Zephyr RTOS VS Code project from this link.
Don’t forget to check out the Zephyr RTOS Real Application Tutorial series.